In my previous post I outlined the basic excavation for our new patio. The next stage in preparing for the concrete to be poured required that I deal with several of the main sprinkler lines that existed under it. I could have just left them but if a leak developed under the new patio there would be no way of addressing it with out significant difficulty. For this reason I determined that it would be best if I dealt with them now, especially since the yard was already dug up and it would be easier to handle while I had the space to work without worrying about making an extraordinary mess.
Know Whats Below
Since this project involves digging you need to make sure to call your local blue stakes organization to have the local utilities mark up your yard so you do not inadvertently dig through that all important cable or pipe.
Understanding What Needs To Be Done
The first part of this project required that I figure out exactly what pipes were buried under the space for the new patio. I had a general idea but I was not completely sure where the pipes were located.
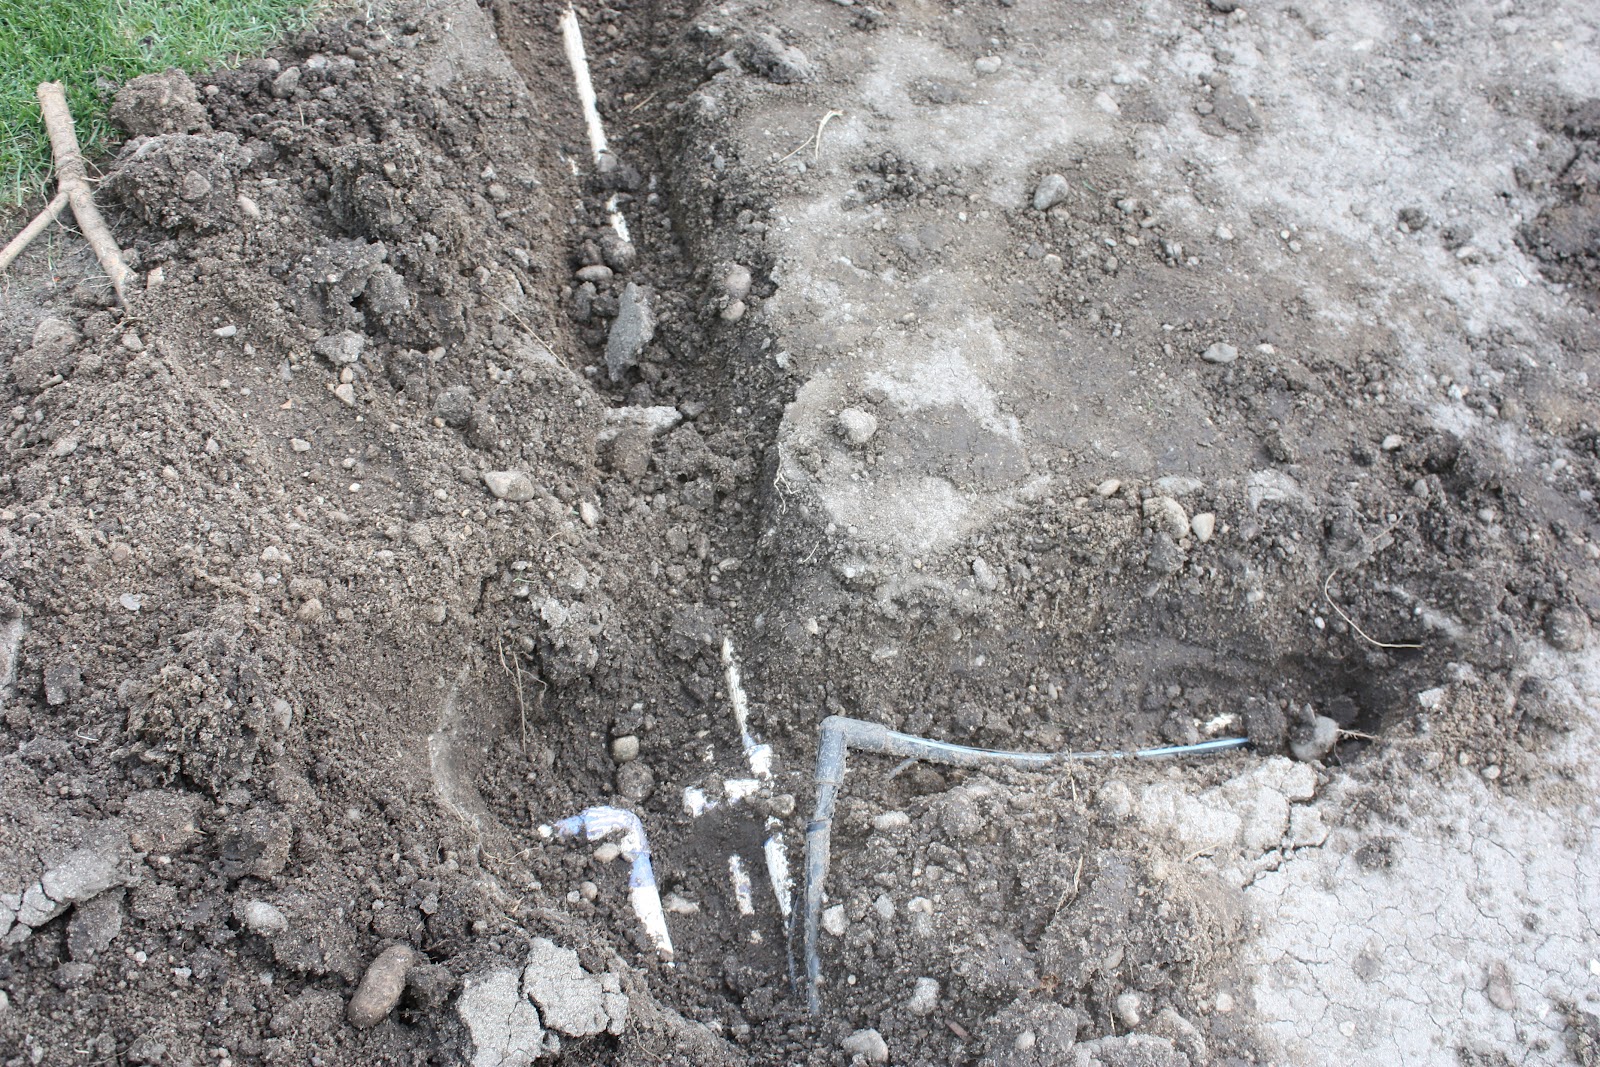
To start I dug a small hole in a location where I knew all of the lines leading into the back yard were located.
This hole allowed me to identify that there were three main white PVC lines, a black low pressure drip line, and the main wire for controlling the sprinkler valves leading into the back yard. Even though I knew that all of these lines were going into the back yard I was still not sure where they crossed the patio. To figure this out I needed to dig another hole near the corner of the pergola over the existing patio where I know at least some of these lines would be crossing the patio.
After a little exploratory digging I was able to identify that all of the water lines going into the back yard ran through the patio area. Two of the PVC pipes ran straight through along the front of the existing patio. The third PVC pipe and the drip line turn in the middle of the patio and ran back toward the house and out into the yard.
Installing The Conduit
Identifying The Existing Lines And Preparing For The New Ones
The first step in connecting the two pipes required that I install the PVC slip to thread adapters on the ends of the existing PVC lines buried in the yard.
Working with PVC is really simple. Here are the basic steps.
Thats all there is to it. The connection will set up quickly so that you cannot twist it anymore in less than a minute and it will be completely secure in about five minutes.
Next I needed to thread the flexible adapters into the newly installed PVC adapters. I recommend that you apply a small amount of Teflon Enriched Pipe Thread Sealant to the threads of the flexible pipe adapters before you thread them into the PVC adapters as it will prevent leaking and it is much easier to work with then Teflon tape. (Sorry for not illustrating this in the pictures.)
With the flexible pipe adapters installed I only needed to slip the ends of the flexible pipe on to the ends of the adapters and secure them with a pipe clamp. The first step in doing this is to slide the pipe clamp over the end of the flexible pipe so that it will be in place after the pipe is slid onto the adapter.
With the pipe clamp in place you need to slip the pipe onto the end of adapter to make the connection. This can often be rather difficult because the inside diameter of the flexible pipe is smaller than the adapter and it generally doesn't slide on easily. The trick I use is to heat the end of the flexible pipe slightly before attempting to slide it over the adapter. This will make the flexible pipe more malleable and it will stretch more easily over the end of the adapter. You do not need to heat the pipe much just so it is uncomfortable to hold, like it was sitting in the sun on a hot summer day. I use a soldering torch because it is quick but you could also use a hair dryer.
While the pipe is still warm slide it onto the adapter and tighten the pipe clamp over the ridged section of the adapter to secure the pipe in place and make a water tight seal.
On the other end of the conduit near the pergola I also installed a few additionally T's that I could use at a later time to quickly tap into the main supply lines. These are installed similarly using pipe clamps and a little heat to make it easier to slide the pipe over the ends of the T.
With all of the connection finished on both ends of the conduit I was able to test the sprinkler system then fill in the trenches knowing that I would not have to worry about the sprinkler lines running under the new patio.
To start I dug a small hole in a location where I knew all of the lines leading into the back yard were located.
 |
| Hole To Identify The Lines Leading Into The Back Yard |
This hole allowed me to identify that there were three main white PVC lines, a black low pressure drip line, and the main wire for controlling the sprinkler valves leading into the back yard. Even though I knew that all of these lines were going into the back yard I was still not sure where they crossed the patio. To figure this out I needed to dig another hole near the corner of the pergola over the existing patio where I know at least some of these lines would be crossing the patio.
 |
| Finding The Lines Under The Patio |
After a little exploratory digging I was able to identify that all of the water lines going into the back yard ran through the patio area. Two of the PVC pipes ran straight through along the front of the existing patio. The third PVC pipe and the drip line turn in the middle of the patio and ran back toward the house and out into the yard.
Choosing The New Path
Knowing where the existing pipe were buried and where they were going I needed to decide where I would move them. The two lines that were running back toward the house could be moved easily by simply trenching through the flower bed from where they entered the back yard. For the other lines I considered trenching around the new patio area but I hesitated because they would necessarily continue run through my small garden near the fence and I hated having to worry about them when tilling in the spring.
After considering this problem for a while I decided that I would still have the water lines run under the new patio but I would run them through some conduits that would allow me to easily deal with an leaks as well as providing a convenient path for running future pipes or wires that may need to run under the patio. The conduit would run from the corner of the pergola to the corner of the house where the lines entered the backyard.
Before I started digging the trench where the counduit would be placed I stretched a string across the patio and marked the path with some orange paint so that I could more easily dig in a straight line.
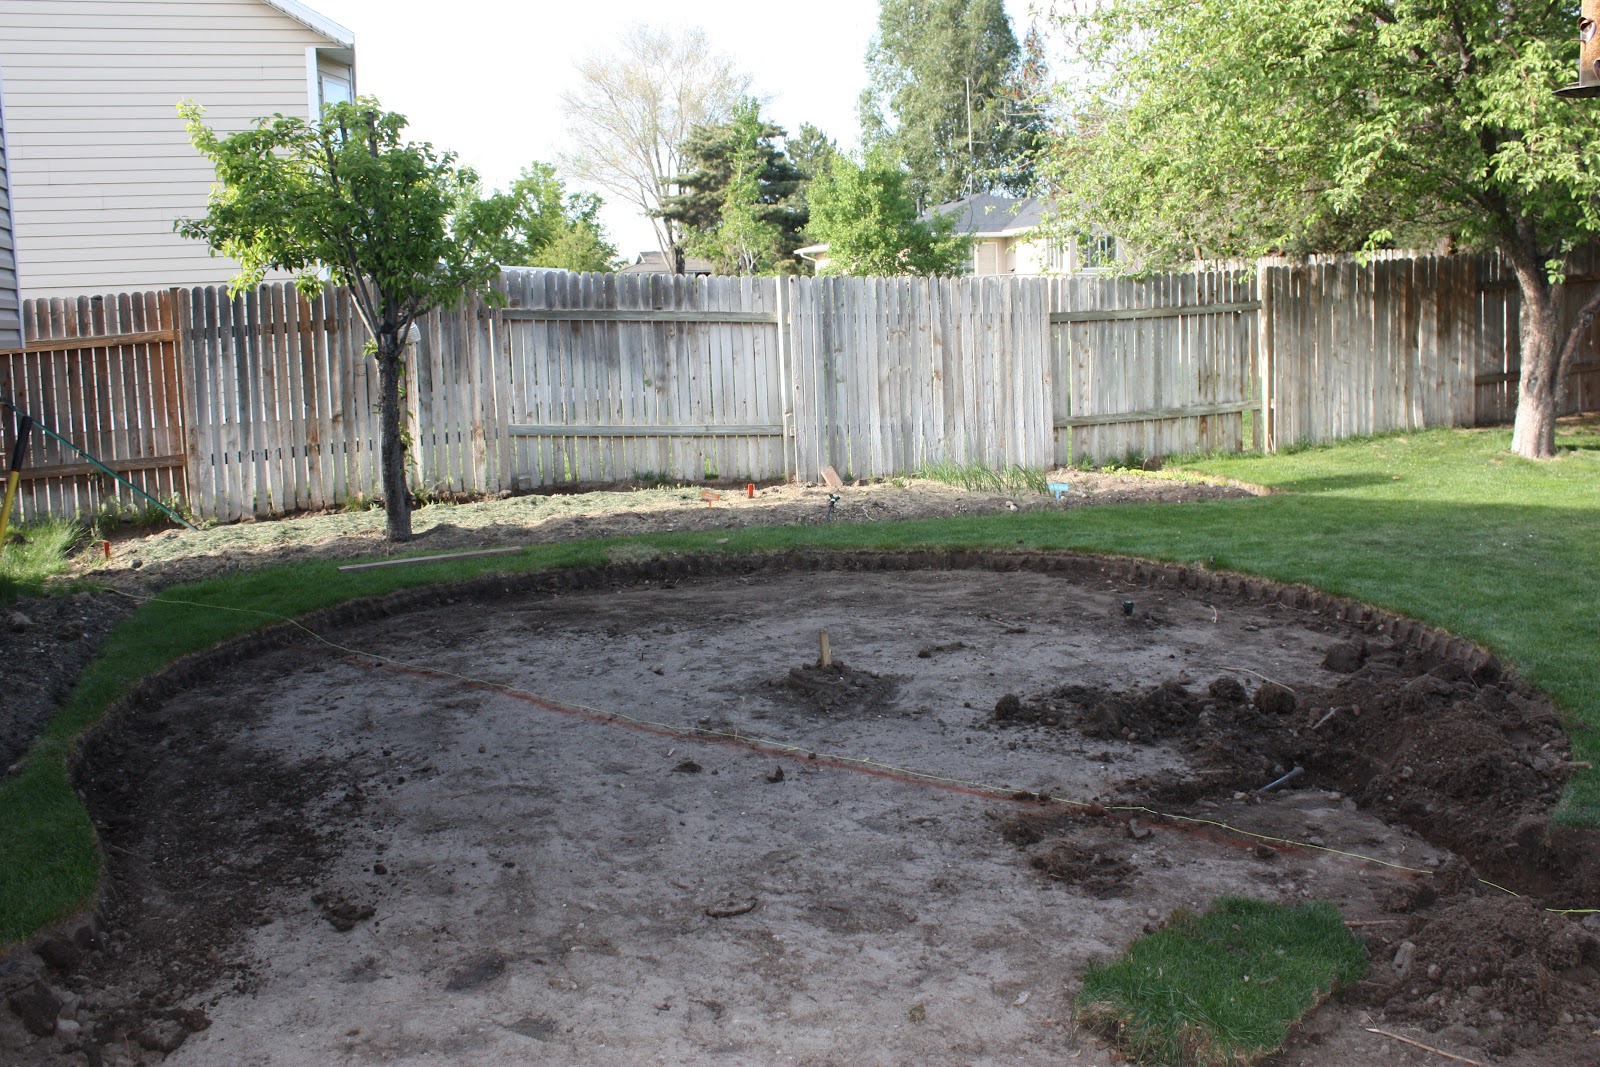 |
| Marking The Location Where The Conduit Will Be Placed |
Installing The Conduit
My plan was to bury 4" sewage pipe which would be used as the conduit because it is inexpensive and easy to work with. Additionally the 4" sewer pipe is also large enough that it would be relatively easy to thread the sprinkler lines through them even at the final distance of about 25 feet. Considering the plan I also decided that I wanted to have extra capacity for future needs and since the pipe was affordable and the extra work needed was nominal I decided to install three pipes across the patio.
 |
| Excavating The Trench |
 |
| The Finished Trench |
 |
| The Conduit |
Identifying The Existing Lines And Preparing For The New Ones
With the conduit in the trench I was ready to run the new lines under the patio from where they entered the back yard on the corner of the house to the corner of the pergola and out into the yard.
The first thing I needed to do was identify and mark the lines entering the back yard as well as the pipes leading into the different parts of the yard from the corner of the pergola. To do this I simply drilled a very small hole in each pipe being sure to only drill holes in portions of the pipe that were going to be discarded. With the small holes in the pipes I manually turned on the different stages of the sprinkler system and marked the pipes with the stage number that caused water to spray out of the pipe. I wrapped pieces of tape around each pipe to mark them but you could just write the stage number on the pipe with a permanent marker.
With the pipes marked I cut the lines with a reciprocating saw and removed enough of the existing lines running under patio so that they would not be in the way when installing the new ones.
Running The New Lines
With the existing lines marked and cut I only needed to run the new lines through the conduit connecting the similarly marked existing pipes on either end. Because I needed to thread the new lines through the conduit I decided to use flexible water lines to connect the two ends of the existing lines.
Connecting New To Old
Since the existing pipe is PVC and the new pipe is flexible a few different connectors or adapters are required. For this I used a slip to female thread PVC adapter and male thread to slip flexible pipe adapter.
The first thing I needed to do was identify and mark the lines entering the back yard as well as the pipes leading into the different parts of the yard from the corner of the pergola. To do this I simply drilled a very small hole in each pipe being sure to only drill holes in portions of the pipe that were going to be discarded. With the small holes in the pipes I manually turned on the different stages of the sprinkler system and marked the pipes with the stage number that caused water to spray out of the pipe. I wrapped pieces of tape around each pipe to mark them but you could just write the stage number on the pipe with a permanent marker.
With the pipes marked I cut the lines with a reciprocating saw and removed enough of the existing lines running under patio so that they would not be in the way when installing the new ones.
Running The New Lines
With the existing lines marked and cut I only needed to run the new lines through the conduit connecting the similarly marked existing pipes on either end. Because I needed to thread the new lines through the conduit I decided to use flexible water lines to connect the two ends of the existing lines.
 |
| Using Flexible Water Line |
 |
| Threading The New Pipe Through The Conduit |
 |
| Pipe Thread Though The Conduit |
Connecting New To Old
 |
| 1" & 3/4" Slip To Female Thread PVC Adapters |
 |
| 1" & 3/4" Male Thread To Slip Flexible Pipe Adapters |
The first step in connecting the two pipes required that I install the PVC slip to thread adapters on the ends of the existing PVC lines buried in the yard.
Working with PVC is really simple. Here are the basic steps.
- Clean the areas of the two pieces of PVC where they will come in contact when they are connected with some water and dry them with a towel.
- Apply the PVC primer to both pieces of the PVC were they will come in contact with each other when they are connected. The primer is usually colored blue or purple and the brush is usually attached to the lid of the container. Be generous and make sure that the entire surface is covered. Don't worry about putting too much on.
- Apply the PVC cement to both pieces of PVC where they will come in contact with each other when they are connected. The cement looks a little like runny rubber cement and the brush is usually attached to the lid of the container. Be generous but not so much that the cement will drip excessively when the two pieces are slipped together. Make sure that the entire surface where the two pipes will come contact is evenly coated.
- Quickly after applying the cement an in a single motion slide the two pieces of the PVC together twisting a quarter turn and then back to the original orientation. The twist makes sure that the cement is applied evenly and all air pockets are filled in for a strong water tight seal.
Thats all there is to it. The connection will set up quickly so that you cannot twist it anymore in less than a minute and it will be completely secure in about five minutes.
 |
| Attaching The PVC Adapters To The Existing Pipes |
Next I needed to thread the flexible adapters into the newly installed PVC adapters. I recommend that you apply a small amount of Teflon Enriched Pipe Thread Sealant to the threads of the flexible pipe adapters before you thread them into the PVC adapters as it will prevent leaking and it is much easier to work with then Teflon tape. (Sorry for not illustrating this in the pictures.)
 |
| Threading The Flexible Pipe Adapters Into The PVC Adapters |
With the flexible pipe adapters installed I only needed to slip the ends of the flexible pipe on to the ends of the adapters and secure them with a pipe clamp. The first step in doing this is to slide the pipe clamp over the end of the flexible pipe so that it will be in place after the pipe is slid onto the adapter.
 |
| Slide The Pipe Clamp Onto The Pipe Before Making The Connection |
With the pipe clamp in place you need to slip the pipe onto the end of adapter to make the connection. This can often be rather difficult because the inside diameter of the flexible pipe is smaller than the adapter and it generally doesn't slide on easily. The trick I use is to heat the end of the flexible pipe slightly before attempting to slide it over the adapter. This will make the flexible pipe more malleable and it will stretch more easily over the end of the adapter. You do not need to heat the pipe much just so it is uncomfortable to hold, like it was sitting in the sun on a hot summer day. I use a soldering torch because it is quick but you could also use a hair dryer.
 |
| Heat The End Of The Pipe To Make The Connection Easier |
While the pipe is still warm slide it onto the adapter and tighten the pipe clamp over the ridged section of the adapter to secure the pipe in place and make a water tight seal.
 |
| Slide Pipe Onto The Adapter And Tighten Pipe Clamp |
 |
| All Of The Connections Finished |
On the other end of the conduit near the pergola I also installed a few additionally T's that I could use at a later time to quickly tap into the main supply lines. These are installed similarly using pipe clamps and a little heat to make it easier to slide the pipe over the ends of the T.
 |
| Flexible Pipe Slip To Tread T & Threaded Plug |
 |
| T's Installed & All Connections Made |


